Presets
Presets can be used to save your favorite light configurations to apply later! You can compare them to the "scenes" feature present in some other smart devices.
Overview
Presets are stored in a /presets.json file in an internal filesystem, with support for up to 250 presets.
Each preset can save all segments that are set up.
The maximum number of segments is 16 on ESP8266 and 32 on ESP32 (up to 64 with PSRAM).
Presets can contain both HTTP and JSON API commands (replacing the previous Macro feature), and each can be given a name for easy access.
How to Use
The preset system has quite a few options, so it is likely not entirely self-explanatory.
Here you can find what each setting does and how to make best use of it!
"Create Preset" button
Use this to save the current state as a permanent preset, or to add a new API macro.
Preset name
Enter a nice name for your preset here. I would recommend putting something short, but to the point here, like Epic fireworks or Slow fade.
All special characters and emoji are permitted (however, there must not be more than 6 consecutive whitespaces)
If you leave this empty, you'll get a name based on the preset ID number, like Preset 16.
Quick load label
You can optionally add a short label up to 2 characters or 1 emoji long.
It will show up in a small circle on top of the preset list for extra quick access without scrolling!
I recommend using this for the presets you truly love.
Use current state/Overwrite with state
This is enabled by default when adding a new preset and disabled when editing an existing preset.
When enabled, it will write the current segment config, including all colors and effect, to the preset.
When disabled, it will instead give you a textfield to enter a custom API command or show you the command currently saved.
Include brightness
If disabled, the brightness value is not included in the preset. This can be useful e.g. when you want to control the brightness manually and want the preset to only set the effect.
Save segment bounds
This is an important one. Make sure it is enabled for your boot preset, so that your segment config is properly restored on boot!
When disabled, the segment start and stop LEDs are not included in the preset. This can be useful if you plan to make changes to your segment setup and don't want your presets to always reset it to the point it was when the preset was saved.
API command
This accepts any HTTP or JSON API command! (only visible if the current state checkbox is unchecked)
It replaces the previous macro functionality.
If you know your JSON, you can even create playlists of other presets!
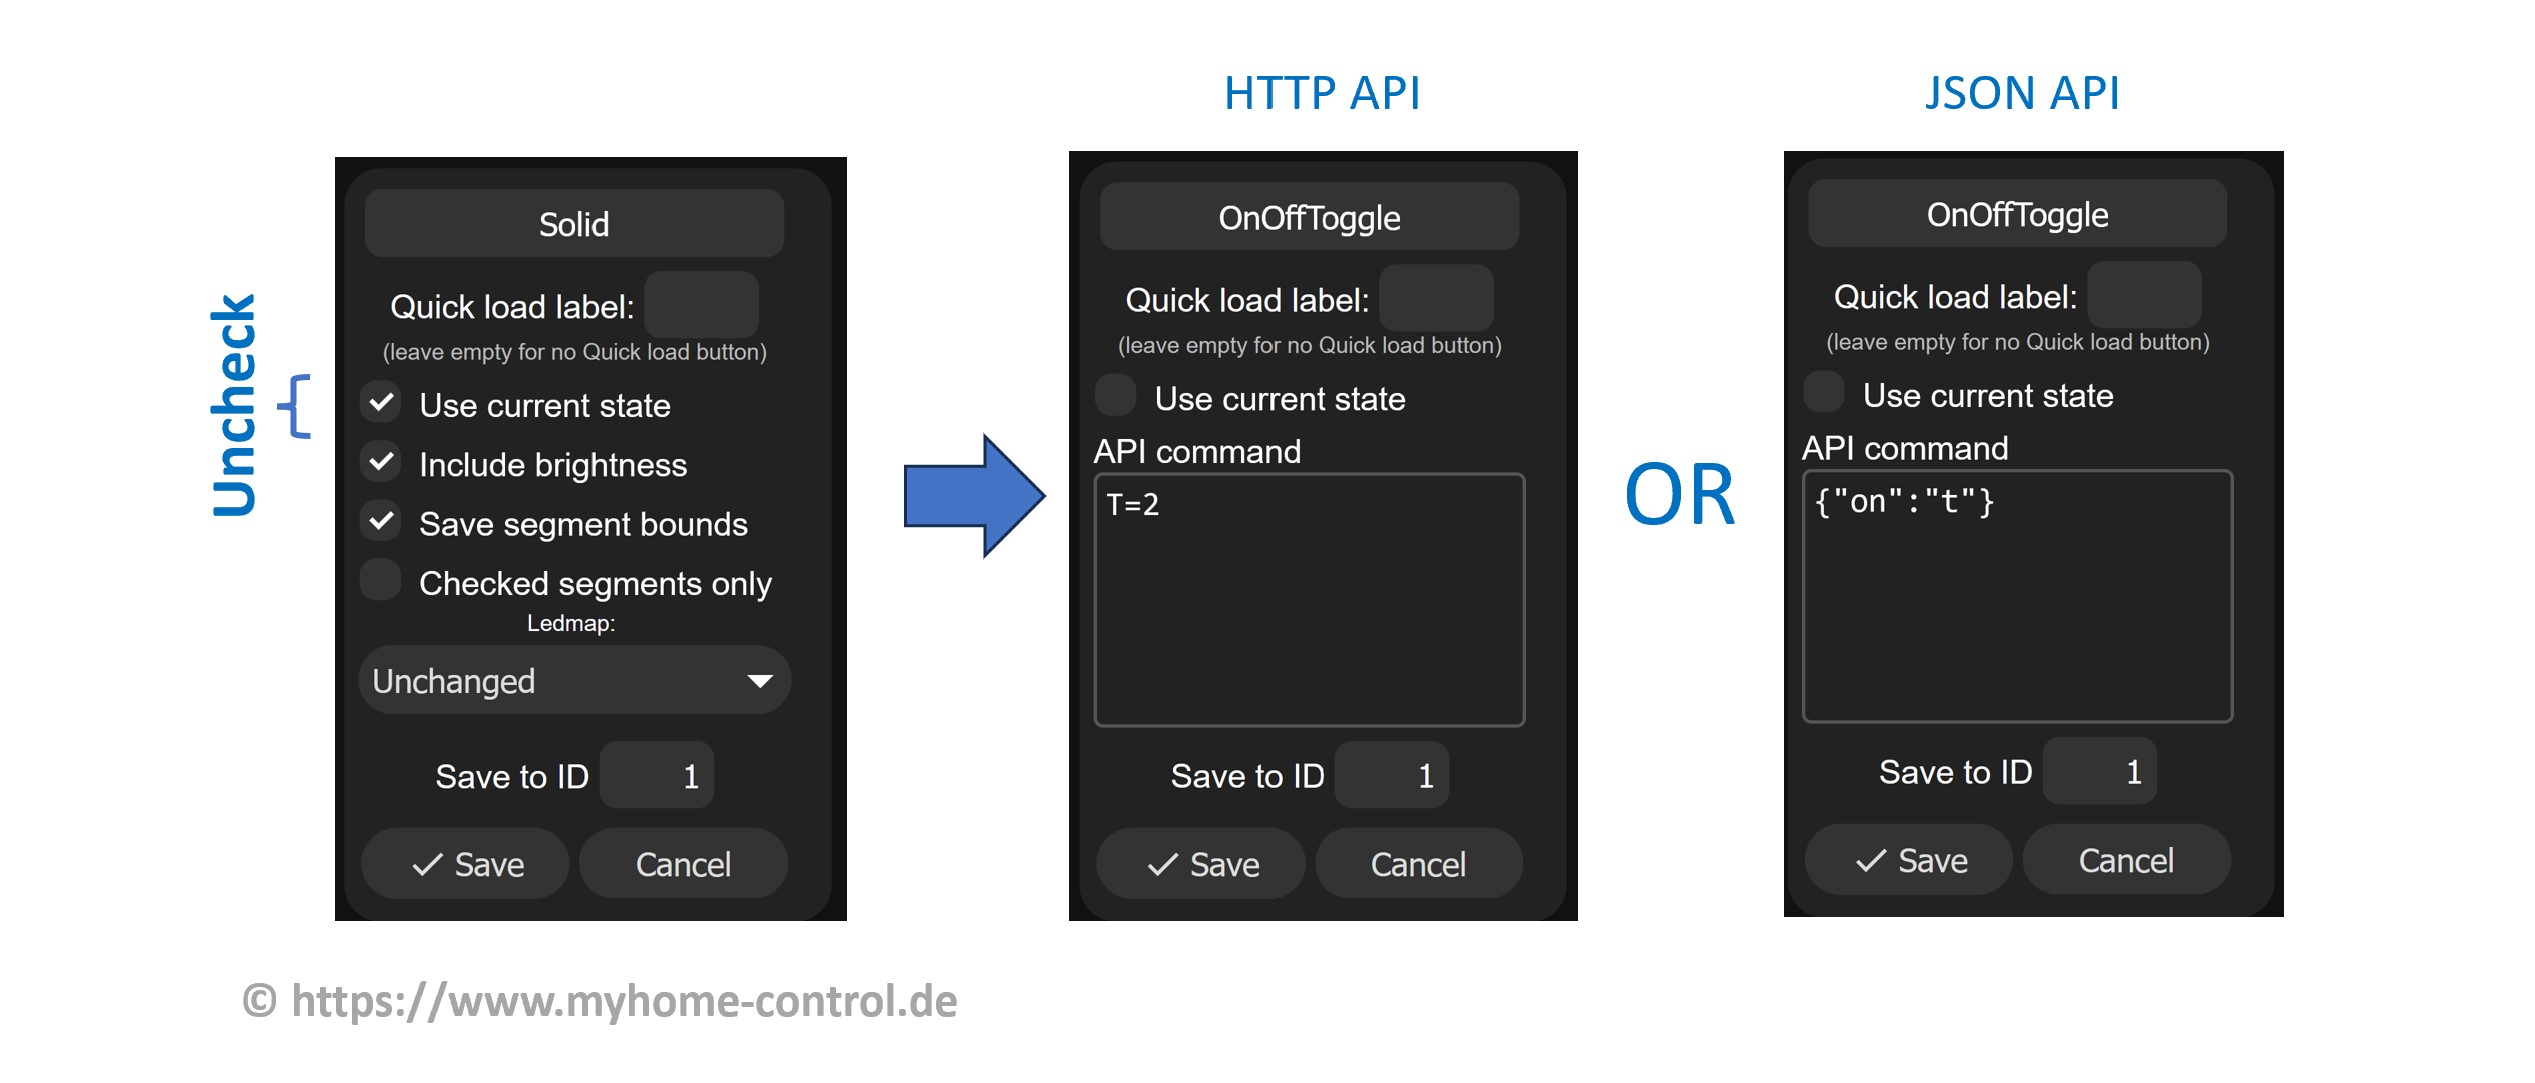
Some basic examples of API commands:
| HTTP API | JSON API | Description |
|---|---|---|
| T=2 | {"on":"t"} | Switch between on and off state (toggle). So when LEDs are off, they turn on and vice versa. |
| T=1 | {"on":true} | The LEDs turn on (or no change if they were already on) |
| T=0 | {"on":false} | The LEDs are switched off (or no change if they were already off) |
| n.a. | {"on":true, "tt":0} | The LEDs are switched on, the LEDs light up immediately without slowly dimming, regardless of the global setting „Transition“. |
| A=128 | {"bri": 128} | The brightness is set to 50%. Minimum value is 0, maximum value (100%) is 255. Therefore 128 means the brightness of 50% |
| A=~10 | {"bri":"~10"} | The brightness is increased by 10. So if this was 100 before, it will be 110. |
| A=~-20 | {"bri":"~-10"} | The brightness is decreased by 20. So if this was 100 before, it will be 80. |
| R=255&G=0&B=0 | {"seg":[{"col":[[255,0,0]]}]} | The color of LEDs is set to red |
| R=0&G=255&B=0&A=128&FX=0 | {"seg":[{"fx":0, "col":[[0,255,0]]}], "bri":128} | The color of LEDs is set to green, brightness to 50% (value 128) and effect to solid (FX=0) |
| P1=1&P2=3&PL=~ | {"ps":"1~ 3~"} | Iterate between presets with IDs 1 to 3: When called up, the next preset is called up and so on in cycle: 1->2->3->1->2->3->1->… |
Save to ID
This is the ID the preset will be saved to.
When creating a new preset, you likely won't have to change it as the lowest unused ID will be chosen automatically.
If you change the ID on an existing preset and save, you can copy it to the new ID - change the name though.
Save and Delete buttons
Now these are self-explanatory, but I said I'd cover each point :)
ID
This is the number you'll want to use to apply this preset from a timed macro or automation!
A note on performance
The preset system is quite fast where it matters, reading the presets.
Applying a preset will typically take less than a tenth of a second.
However, due to a design choice of the LittleFS filesystem used by WLED, random writes to the preset file are very resource intensive.
This means that while updating your presets, you might notice your light freezing and becoming unresponsive for up to a few seconds.
Adding new presets is usually very fast, those performance issues will occur once you delete/edit/overwrite older presets and your preset file becomes very large, or when adding presets after deleting older ones.
I'm looking into ways to mitigate this situation as soon as possible! Meanwhile, to keep things snappy, I would recommend not having more than 50-ish single segment or a dozen of multi-segment presets.
Obtaining preset list
Obtaining the preset list is possible with the /presets.json file Seeing the name of the current preset with the API only is not possible, you can only obtain its ID. Then you'd need some code to match it with the entries from presets.json (this is also what the UI does). See section "Backing up/restoring presets".
Saving named presets
Save a named preset with {"psave":<preset number here>,"n":"Preset name","ib":true,"sb":true}
Backing up/restoring presets
To backup all presets, go to [WLED-IP]/edit (OTA lock must be off), right-click the presets.json file and download!
To restore, use the Choose file and Upload buttons.
Applying presets at a certain time of day
Tip
If you want to create a preset that turns on the light to the last effect displayed, uncheck Use current state and enter T=1 into the API Command field.
WLED supports schedules that apply presets automatically at a specified time. Use these steps to create a schedule:
- Create the presets that you want to load at specific times.
- Note the preset ID - the small gray number to the left of the preset name (or, in the bottom of the preset menu)
- Go to the
Time & Macrossection in the WLED settings. - Make sure the time displayed is correct and accurate. It is highly recommended to enable NTP for a reliable schedule. Do not forget to set the correct timezone.
If applicable, daylight saving time is handled automatically.
- Scroll down to
Time-controlled presets. There are 8 different timer slots available. - Enter the hour, minute, and weekdays you want the preset to activate. In the
Presetcolumn, enter the preset ID you noted earlier. - Hours are measured with the 24-hour clock, where midnight is 0:00. Entering "24" will instead activate the preset hourly.
- Save the settings page! You have successfully set up a schedule :)
Note
This only applies the preset at the start of the specified minute. If you set up two presets, one to turn on the light at 7 and another to turn it off at 8, if WLED is booted at 7:30, the light will not turn on. This should not be an issue in most applications.
Applying presets at sunrise and sunset
Applying a preset at sunrise and/or sunset is also supported, the last two timed preset slots are used for this.
To calculate the times, WLED needs your location. This is possible with the "Get Location" button in Time & Macro settings if accessed via a browser. If you are using the WLED app, you will need to open locate.wled.me in your browser and copy the coordinates over to the settings page manually.
With the Minutes input field, you may specify an offset of up to 120 minutes before or 120 minutes after the actual sunrise/set time.
Location
Sunrise and sunset calculation do not work if you live in the polar circles (latitude >66.6N or >66.6S).