Settings
Web-configurable settings are split in multiple sub-pages. This page is meant to clarify the purpose of each setting.
WiFi Settings
This sub-page offers options to connect the ESP to different WiFi/WLAN devices.
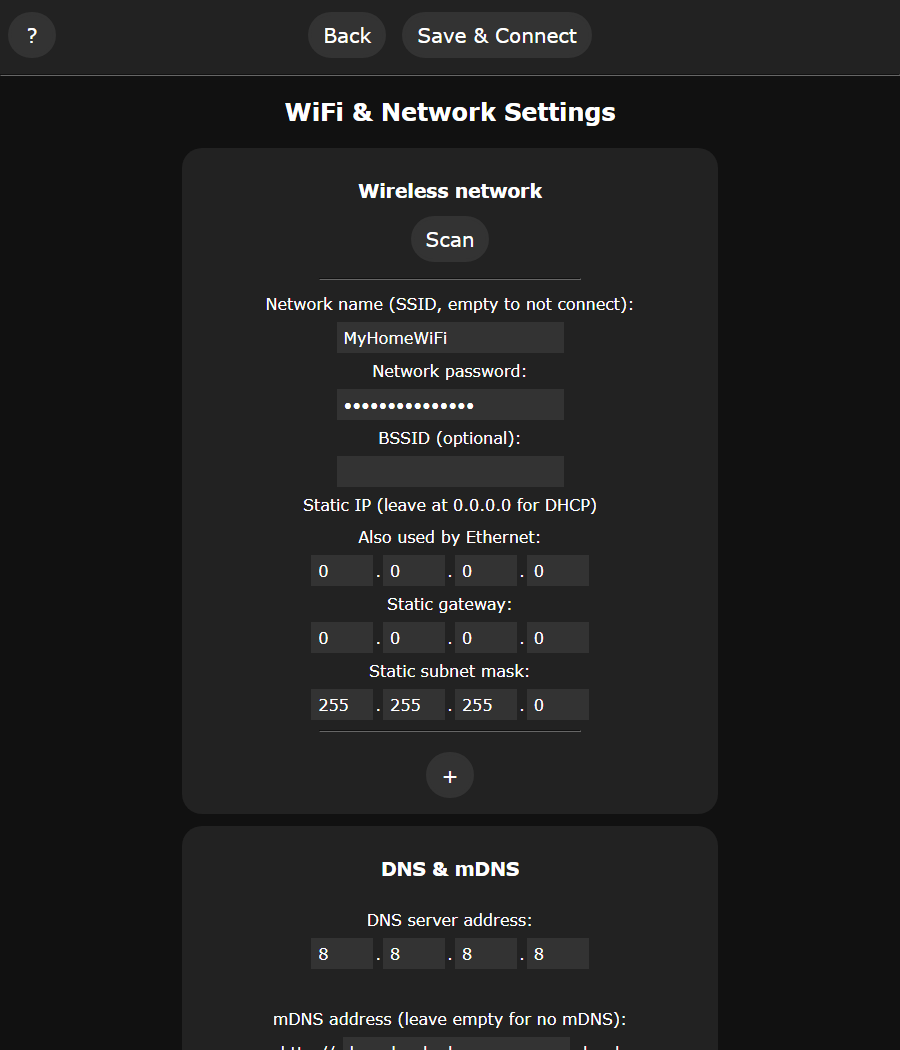
| Setting name | Value Range | Description |
|---|---|---|
| Network name (SSID) | String 0..32 | The name of your home WiFi. Leave empty to not connect. Use Scan to pick from nearby networks |
| Network password | String 0..64 | The password of your home WiFi |
| BSSID | MAC address | Optional. Locks the connection to one specific access point, useful with mesh WiFi |
| Static IP | 4x 0..255 | An optional static IPv4 address. Leave at 0.0.0.0 for DHCP. Also used by Ethernet |
| Static gateway | 4x 0..255 | In a static config, your gateway's IPv4 address |
| Static subnet mask | 4x 0..255 | In a static config, this normally is 255.255.255.0 |
| + | - | Adds another WiFi network. WLED connects to the first one it finds |
| DNS server address | 4x 0..255 | The DNS server to use. Defaults to 8.8.8.8 |
| mDNS address | String 0..32 | Name of your device for the Bonjour/Zeroconf protocol, reachable as http://<name>.local. Leave empty for no mDNS |
| Client IP | - | The current IP of the ESP in the home network |
| AP SSID | String 0..32 | The name of the ESP's internal WiFi hotspot (Access Point). Leave empty for no AP |
| Hide AP name | Y/N | The ESP's Access Point won't appear in WiFi lists of other devices |
| AP password | String 0..63 | The password of the ESP's WiFi Access Point. Leave empty for an open AP |
| Access Point WiFi channel | 1..13 | The 2.4G WiFi channel of the AP. For advanced users |
| AP opens | select | When to open the AP: "No connection after boot", "Disconnected", "Always", "Never (not recommended)" or "Temporary (no connection after boot)" |
| AP IP | - | The Access Point IPv4 address of the ESP (192.168.4.1 in most cases) |
| Force 802.11g mode | Y/N | ESP8266 only. Can help with some access points that struggle with 802.11n |
| Disable WiFi sleep | Y/N | Increases power consumption, but can help with connectivity issues and sync |
| Max. TX power | select | Transmit power from 2 dBm to 19.5 dBm. Lowering it can help on boards with poor antennas or power supplies. Modifying it may render the device unreachable |
| Ethernet type | select | ESP32 builds with Ethernet support only. Pick your board to enable the wired port |
| Enable ESP-NOW | Y/N | Listen for events over ESP-NOW, used by ESP-NOW remotes and ESP-NOW sync. Keep disabled if not using either, it increases power consumption |
LED Preferences
This sub-page configures your LED & Hardware setup.
| Setting name | Value Range | Default | Description |
|---|---|---|---|
| Global brightness factor | 1–100 % | 100 | Scales the master brightness. Use it to cap how bright the strip can get, as an alternative to the automatic brightness limiter. The UI currently accepts values above 100, which is a bug; the firmware handles the setting correctly |
| Enable automatic brightness limiter | on/off | on | Have WLED automatically reduce overall brightness so that maximum current draw from the power supply stays below a specified level. Analog (PWM) and virtual LEDs cannot use it |
| Maximum PSU Current | 250–65000 mA | 3000 mA | Maximum allowable current draw that WLED will target. Keep below 1 A if powering LEDs from the ESP's 5V pin [only appears if "Enable automatic brightness limiter" is on] |
| Use per-output limiter | on/off | off | Set a separate current limit per output instead of one for the whole device. Recommended when using multiple outputs [only appears if "Enable automatic brightness limiter" is on] |
The page also shows the total LED count and the power supply size needed for full white across all outputs.
Hardware Setup
LED outputs
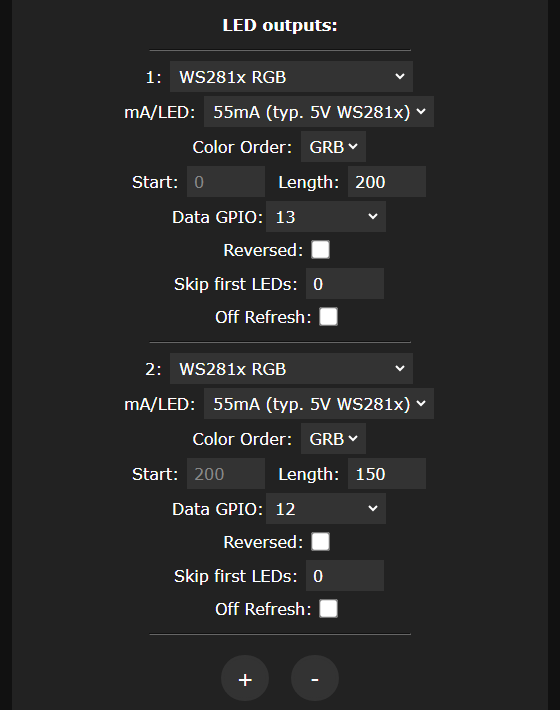
WLED supports multiple outputs. To add an output, click the plus(+) button at the bottom of the "LED outputs" section; to remove the last output, click the minus(-) button. Below the plus/minus buttons is an indication of how much of the memory allocated to LEDs is being used by the configuration.
All outputs share the same address space within WLED. By default, the first pixel of an output will be given an address that is one higher than the last pixel of the previous output, but this can be altered.
Each output has the following settings:
| Setting name | Value Range | Default | Description |
|---|---|---|---|
| Type (represented by the output's number) | multiple options | WS281x RGB | Select the type of LEDs this output will be controlling |
| mA/LED | multiple options | "55mA (typ. 5V WS281x)" | Current draw of a single pixel at full white, used by the brightness limiter. Pick "Custom" to enter your own value (1–255 mA) [only appears if "Enable automatic brightness limiter" is on] |
| Clock | multiple options | "Normal" | Select the PWM or SPI frequency used when driving supported LEDs Used PWM frequencies for the ESP8266 / ESP32, and SPI respectively; Slowest: 293.33 Hz / 6510.33 Hz / 1 MHz Slow: 440 Hz / 9765.50 Hz / 2 MHz Normal: 880 Hz / 19531 Hz / 5 MHz Fast: 1760 Hz / 39062 Hz / 10 MHz Fastest: 2640 Hz / 58593 Hz / 20 MHz [only appears if "Type" is set to a type that is controlled by PWM or SPI] |
| Color order | multiple options | "GRB" | Select which order your LEDs process color information (e.g. if your LEDs display red and green swapped, try changing it) [only appears if "Type" is set to a type that supports color order] |
| Start/Index | integer | cumulative length of all previous outputs | Define which address this output (or its first pixel) should use within WLED's address space [only editable if "Custom bus start indices" is on] |
| Length | integer | 1 | Define how many pixels are connected to this output [only appears if "Type" is set to a type that supports multiple pixels] |
| (Data/Clk) GPIO(s) | integer | (blank) | Tell WLED which GPIO pin(s) this output is connected to [number and description of GPIO settings will depend on the output's selected type] |
| Reversed (rotated 180°) | on/off | off | Mirrors the LEDs (last LED is first) [only appears if "Type" is set to a type that supports multiple pixels] |
| Skip first LEDs | 0–length | 0 | Will turn off the first one or more LEDs and shift those remaining by that number (e.g. if the first LEDs are only used as a signal repeater) [only appears if "Type" is set to a type that supports multiple pixels] |
| Off Refresh | on/off | off (typically) | WLED doesn't send out data if all of its outputs are off, but some pixels (notably TM1814) will go into a demo mode after a period of inactivity, and setting forces WLED to periodically send out additional "off" commands [only appears if "Type" is set to a type that supports multiple pixels; default is "on" if "Type" is set to "TM1814"] |
| Inverted output | on/off | off | Invert the output's state (i.e. if the output is bright when it's supposed to be dark, set this to "on") [only appears if "Type" is set to a type that supports output inversion] |
| IP address | IPv4 | (blank) | Set the IP address where the output data should be sent to [only appears if "Type" is set to a type that supports network output] |
| Auto-calculate white channel from RGB | multiple options | "None" | Selects whether WLED should attempted to generate white-channel information for colors that are only defined as red, green, and blue values [only appears if "Type" is set to a type that has a white channel, including white-only types like "PCM White"] |
The following settings apply to all LED outputs:
| Setting name | Value Range | Default | Description |
|---|---|---|---|
| Show Advanced Settings | on/off | off | Reveals the hardware driver option for digital outputs, letting you pick between the I2S and RMT drivers. Worth trying if your LEDs flicker with the default driver. The dropdown only appears on chips that have both drivers, so not on the ESP8266 or the ESP32-C3. "Skip first LEDs" and "Off Refresh" are always shown |
| Make a segment for each output | on/off | off | Will automatically create a segment for each output, including the correct Start LED and Stop LED settings |
| Custom bus start indices | on/off | off | When on, custom "Start" or "Index" values can be set for each output (e.g. output 2 can be set so that it shows up as LED address 200 regardless of output 1's length) |
Additionally, one or more Color Order Overrides can be defined by clicking the plus button. This is useful when you have LEDs with two different color orders sharing the same output. The following settings are available for each override:
| Setting name | Value Range | Default | Description |
|---|---|---|---|
| Start | integer | 0 | Define which address this color override should start it |
| Length | integer | 1 | Define how many pixels in a row should have their color setting overridden |
| Color order | multiple options | "GRB" | Same as "Color order" above |
Color & White
| Setting name | Value Range | Default | Description |
|---|---|---|---|
| Use Gamma correction for color | on/off | on | Corrects colors so they look closer to what you see on a monitor. Strongly recommended |
| Use Gamma correction for brightness | on/off | off | Corrects brightness changes so they look more linear. Not recommended |
| Use Gamma value | 0.1–3 | 2.2 | The gamma curve used by the two corrections above |
| White Balance correction | on/off | off | Adds a color temperature (CCT) slider and tints RGB colors warmer or colder to match it. Works on plain RGB strips, not only CCT strips |
| Global override for Auto-calculate white | multiple options | "Disabled" | Overrides the per-output "Auto-calculate white channel from RGB" setting for every output |
| Calculate CCT from RGB | on/off | off | Derives the color temperature from the RGB color instead of the CCT slider |
| CCT IC used (Athom 15W) | on/off | off | Enable if your controller uses a CCT IC |
| CCT blending | -100–100 % | 0 | Positive values blend the warm and cold white channels additively, negative values keep them exclusive. Set to 0 for 2-wire (reverse polarity) CCT strips |
Hardware Setup (buttons, IR, relay)
The lower part of the page configures the other hardware attached to your controller. Each is covered on its own page:
- Buttons: add button GPIOs and pick their type (pushbutton, switch, PIR sensor, touch, analog). What a button does is set up under Macros.
- IR Remote: the IR receiver GPIO and remote type, see Infrared.
- Relay: the relay GPIO and its invert / open drain options, see Control a Relay.
General settings
| Setting name | Value Range | Default | Description |
|---|---|---|---|
| Turn LEDs on after power up/reset | on/off | on | Whether the lights turn on after power-on or restart |
| Bootup brightness | 1–255 | 128 | The master brightness applied at boot |
| Apply preset at boot | 0–250 | 0 | Preset to load at boot (0 = none) |
| Default transition time | 0–65500 ms | 750 | How long the crossfade lasts when colors, effects or brightness change |
| Use harmonic colors in Random palettes | on/off | on | Picks colors that go together when a random palette is generated |
| Random Palette Cycle Time | 1–255 s | 5 | How often the random palette changes |
| Timed light: Default duration | 1–255 min | 60 | How long the nightlight timer runs |
| Timed light: Default target brightness | 0–255 | 0 | The brightness the lights end at when the timer finishes (0 = off) |
| Timed light: Mode | multiple options | "Fade" | "Wait and set" jumps to the target brightness at the end, "Fade" and "Fade Color" dim gradually, "Sunrise" brightens instead |
| Palette wrapping | multiple options | "Linear (wrap if moving)" | How a palette behaves at its end (the seam) |
| Target refresh rate | 0–250 FPS | 42 | Frame rate WLED aims for. 0 means unlimited, which is experimental, as is anything well above the default |
User Interface settings
This sub-page changes the look of the web interface.
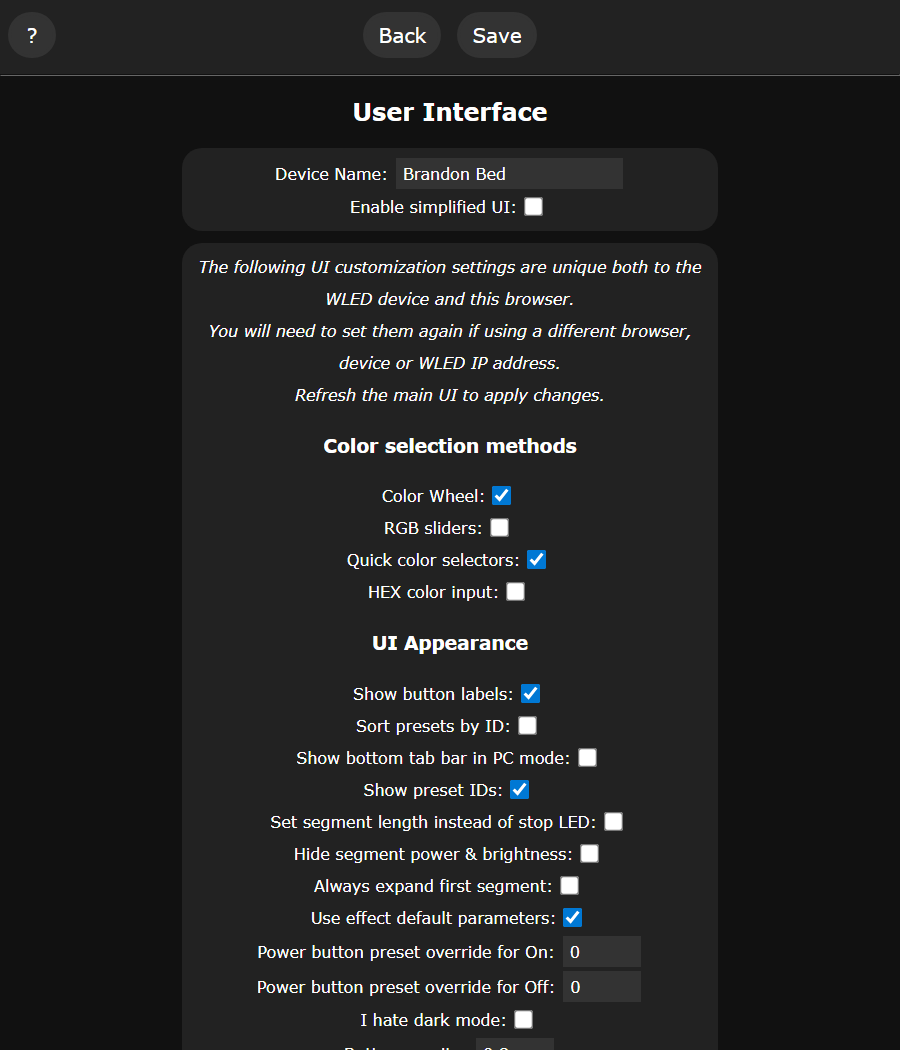
| Setting name | Value Range | Description |
|---|---|---|
| Device Name | String 1..32 | The name of the device as shown in the UI, the info panel and the Nodes list. Differs from the Alexa device name |
| Enable simplified UI | Y/N | Hides the advanced controls for a cleaner, beginner-friendly interface |
Most of the rest of this page is stored in your browser, not on the device: you need to set it again when using a different browser, device or WLED IP address, and refresh the main UI to apply changes. The exceptions are the custom CSS and the Holidays list, which are uploaded to the device as files.
| Setting name | Value Range | Description |
|---|---|---|
| Color Wheel | Y/N | Show the color wheel on the Colors tab |
| RGB sliders | Y/N | Show individual red, green and blue sliders |
| Quick color selectors | Y/N | Show the row of preset color buttons |
| HEX color input | Y/N | Show a text field for entering a hex color code |
| Show button labels | Y/N | Show text under the top bar icons |
| Sort presets by ID | Y/N | Order presets by ID instead of name |
| Show bottom tab bar in PC mode | Y/N | Keep the Colors/Effects/Segments/Presets bar visible when all tabs are shown side by side |
| Show preset IDs | Y/N | Show the ID number next to each preset |
| Set segment length instead of stop LED | Y/N | Enter a segment's length rather than its last LED |
| Hide segment power & brightness | Y/N | Hide the per-segment power button and brightness slider |
| Always expand first segment | Y/N | Open the first segment's controls by default |
| Use effect default parameters | Y/N | Load an effect's recommended speed, intensity and palette when it is selected |
| Power button preset override for On/Off | 0..250 | Load this preset instead of simply turning on or off. 0 disables the override |
| I hate dark mode | Y/N | Switch the UI to a light theme |
| Button opacity | 0..1 | Transparency of the UI buttons |
| Enable custom CSS | Y/N | Apply a custom CSS file uploaded to the device |
| Background opacity | 0..1 | Transparency of the background layer |
| BG HEX color | hex | Solid background color |
| BG image / Random BG image / BG image URL | - | Upload a background image, use a random one, or point at a URL |
| Enable custom Holidays list | Y/N | Use your own list of holidays for the holiday-themed UI decorations, uploaded to the device as a JSON file |
| Clear local storage | - | Clears the preset and palette data this browser has cached. The UI settings above are kept |
Sync settings
This sub-page configures external software synchronization interfaces.
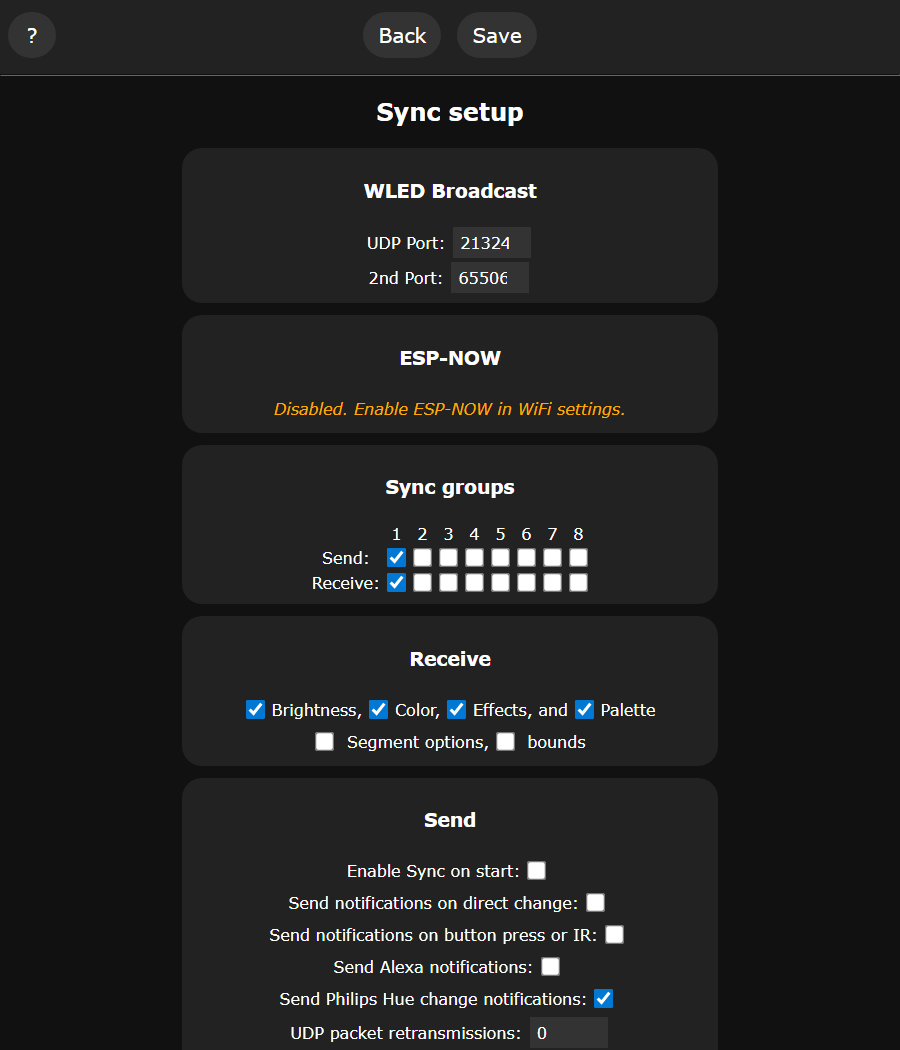
WLED Broadcast and ESP-NOW
| Setting name | Value Range | Description |
|---|---|---|
| UDP Port | 1..65535 | All WLED lights you want to group together must have the same port |
| 2nd Port | 1..65535 | A second port to listen on, for grouping with devices that use a different one |
| ESP-NOW | - | Sync over ESP-NOW instead of WiFi. Enabled under WiFi settings |
| Sync groups: Send | 8x Y/N | Which of the 8 groups this device sends to |
| Sync groups: Receive | 8x Y/N | Which of the 8 groups this device listens to. A device only applies notifications from groups it receives |
Receive and Send
| Setting name | Value Range | Description |
|---|---|---|
| Receive Brightness, Color, Effects, Palette | 4x Y/N | Which parts of a sync notification to apply |
| Receive Segment options | Y/N | Also apply per-segment settings such as mirror and reverse |
| Receive Segment bounds | Y/N | Also apply segment start and stop positions. Only useful when the devices have the same LED layout |
| Enable Sync on start | Y/N | Start with sending enabled after boot |
| Send notifications on direct change | Y/N | Send a sync notification when state changed via web UI or API |
| Send notifications on button press or IR | Y/N | Send sync when toggled by a button or IR remote |
| Send Alexa notifications | Y/N | Send sync after being changed by Alexa (you may use Alexa groups instead) |
| Send Philips Hue change notifications | Y/N | Send sync after a connected Philips light changed |
| UDP packet retransmissions | 0..30 | How many extra copies of each notification to send, if you have issues with UDP packet loss. Reboot required |
Instance List
| Setting name | Value Range | Description |
|---|---|---|
| Enable instance list | Y/N | Show other WLED devices on the network under the Nodes button |
| Make this instance discoverable | Y/N | Let other WLED devices list this one |
Realtime
| Setting name | Value Range | Description |
|---|---|---|
| Receive UDP realtime | Y/N | Receive live UDP stream data (DRGB, WARLS, ...) |
| Use main segment only | Y/N | Apply realtime data to the main segment only, leaving the others running their effects |
| Respect LED Maps | Y/N | Apply the active LED map to incoming realtime data |
| Network DMX input: Type | select | E1.31 (sACN), Art-Net, or a custom port |
| Multicast | Y/N | Listen on the multicast IP instead of unicast |
| Start universe | 0..63999 | The first universe to listen to. If you want different content on several ESPs, set them at least 8 universes apart. Reboot required |
| Skip out-of-sequence packets | Y/N | Drop packets that arrive out of order instead of showing them |
| DMX start address | 1..510 | The first DMX channel this device listens to within the start universe |
| DMX segment spacing | 0..150 | Channel gap between segments in the "Effect Segment" modes |
| E1.31 port priority | 0..200 | Accept data only from sources with at least this priority |
| DMX mode | select | How incoming channels map to LEDs: Disabled, Single RGB, Single DRGB, Effect, Effect + White, Effect Segment, Effect Segment + White, Multi RGB, Dimmer + Multi RGB, Multi RGBW, Preset. See E1.31 |
| Timeout | 1..65000 ms | Time after which to resume normal mode once a stream has stopped. 65000 keeps the data indefinitely |
| Force max brightness | Y/N | Show realtime streams at max brightness (unless limited by the brightness limiter) |
| Disable realtime gamma correction | Y/N | Check if your host software does gamma correction already |
| Realtime LED offset | -255..255 | Shift the realtime input by this many LEDs |
Wired DMX Input
Only on builds with DMX input support.
| Setting name | Value Range | Description |
|---|---|---|
| DMX RX / TX / Enable Pin | GPIO | The pins of the RS485 transceiver |
| DMX Port | 1..2 | The hardware serial port to use. Reboot required |
Alexa Voice Assistant
| Setting name | Value Range | Description |
|---|---|---|
| Emulate Alexa device | Y/N | Allows you to control the light via the Amazon Echo voice assistant. Requires reboot |
| Alexa invocation name | String 1..32 | The name you want the device to have for control via Alexa. Choose something easy she can understand |
| Also emulate devices to call the first N presets | 0..9 | Exposes the first N presets as extra Alexa devices so you can call them by name |
MQTT
| Setting name | Value Range | Description |
|---|---|---|
| Enable MQTT | Y/N | Connect to an MQTT broker. Reboot required |
| Broker | IP or String 0..32 | The host of the MQTT broker |
| Port | 1..65535 | The broker's port, usually 1883 |
| Username / Password | String 0..40 / 0..64 | Broker credentials. Sent over an unsecured connection, never reuse a password from another service |
| Client ID | String 0..40 | How this device identifies itself to the broker |
| Device Topic | String 0..32 | MQTT topic unique to this light |
| Group Topic | String 0..32 | MQTT topic for all lights in a group (room, floor, ...) |
| Publish on button press | Y/N | Publish state changes caused by a button or IR remote |
| Retain brightness & color messages | Y/N | Ask the broker to keep the last state message for new subscribers |
Philips Hue
| Setting name | Value Range | Description |
|---|---|---|
| Poll Hue light | 1..99 | The ID of the Hue lamp you want to sync WLED to |
| every x ms | 100..65000 | How often to poll. Smaller numbers decrease lag but might hurt bridge responsiveness. The checkbox after the interval turns polling on or off |
| Then, receive On/Off, Brightness, Color | 3x Y/N | Which properties to copy from the Hue light |
| Hue Bridge IP | 4x 0..255 | Your Hue bridge IPv4 address. This address should be static to avoid reassigning. Press the pushlink button on the bridge before saving the first time |
| Hue status | - | Shows the current connection status to the Hue bridge |
MQTT and Hue sync connect to external hosts, which may impact the responsiveness of WLED. For best results, use only one of them at a time.
Serial
| Setting name | Value Range | Description |
|---|---|---|
| Baud rate | select | Serial speed from 115200 to 1500000. Keep at 115200 to use Improv. Some boards may not support high rates |
Time settings
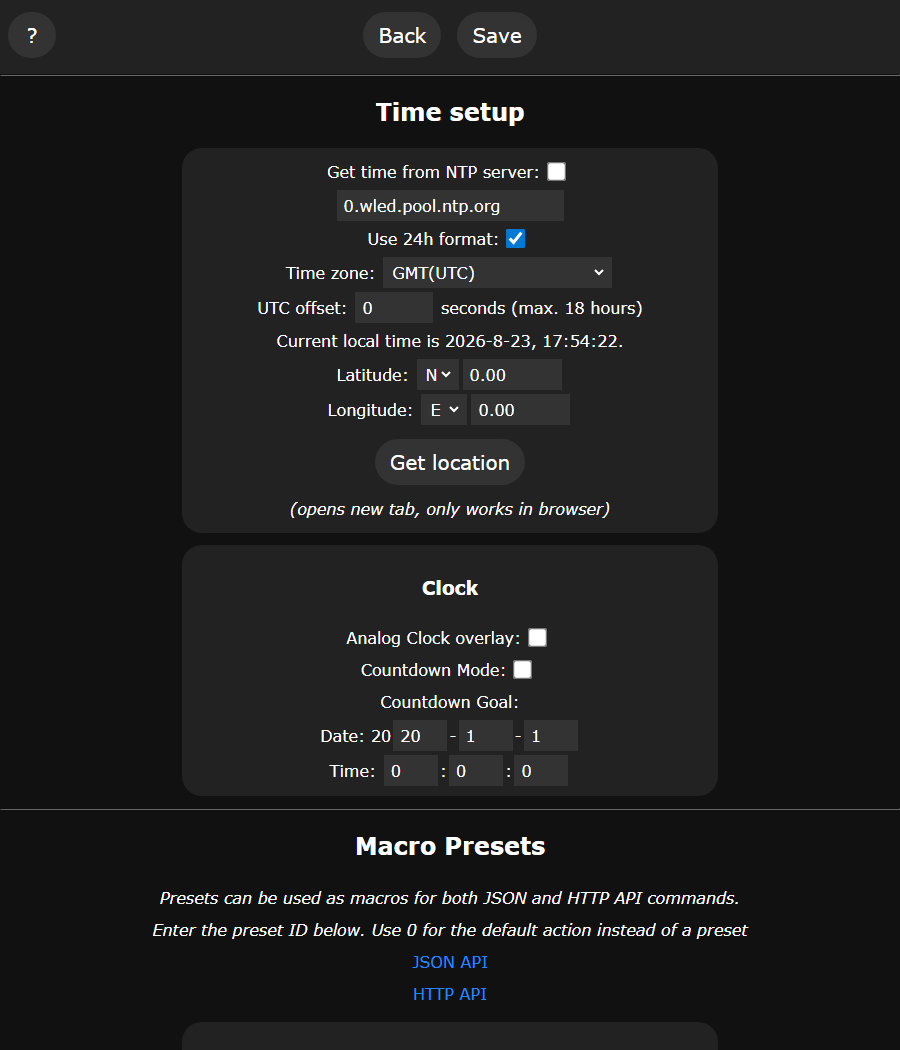
This sub-page configures the clock, sunrise and sunset, and preset automation.
| Setting name | Value Range | Description |
|---|---|---|
| Get time from NTP server | Y/N | Whether to get the current time from the internet. The server can be changed from the default 0.wled.pool.ntp.org |
| Use 24h format | Y/N | Use 24h clock format instead of AM/PM |
| Time zone | select | Your time zone. Open an issue if yours is unsupported. DST is applied automatically |
| UTC offset | -65500..65500 | Seconds to offset on top of the time zone. If you want e.g. 1h offset, use 3600 |
| Current local time | - | The local time the ESP has acquired. If set up correctly, should equal actual time |
| Latitude / Longitude | 0..66.6 N/S, 0..180 E/W | Your location, used to calculate sunrise and sunset for timers. Get location fills it in from your browser |
Clock
| Setting name | Value Range | Description |
|---|---|---|
| Analog Clock overlay | Y/N | Draw a clock on the strip using the LED range, 12-o'clock position and options below |
| Countdown Mode | Y/N | Have the overlay count down to the Countdown Goal instead of showing the time |
| Countdown Goal | date and time | The moment the countdown ends |
Macro Presets
Presets can be used as macros for both the JSON and HTTP API. Pick the preset to run on each event, or "Default Action (0)" to keep WLED's built-in behavior.
| Setting name | Value Range | Description |
|---|---|---|
| Countdown-Over Preset | 0..250 | Preset to apply when the countdown is over |
| Timed-Light-Over Presets | 0..250 | Preset to apply when the timed light (nightlight) is done |
| Alexa On/Off Preset | 2x 0..250 | Presets to apply when turning on or off via Alexa |
| Button Action Presets | varies by button type | Pushbuttons get a short press, long press and double press preset (defaults: on/off toggle, random color, nothing). Switches get an On to Off and an Off to On preset instead, and analog buttons get an analog function selector |
| Analog Button setup | - | Opens the macro page for analog buttons |
Time-Controlled Presets
Up to 8 timers (plus sunrise and sunset) that apply a preset at a given time. Each has an enable checkbox, a type (Regular, Sunrise, Sunset), the hour and minute (or an offset from sunrise/sunset), the preset to apply, and which days of the week and date range it is active.
Security settings
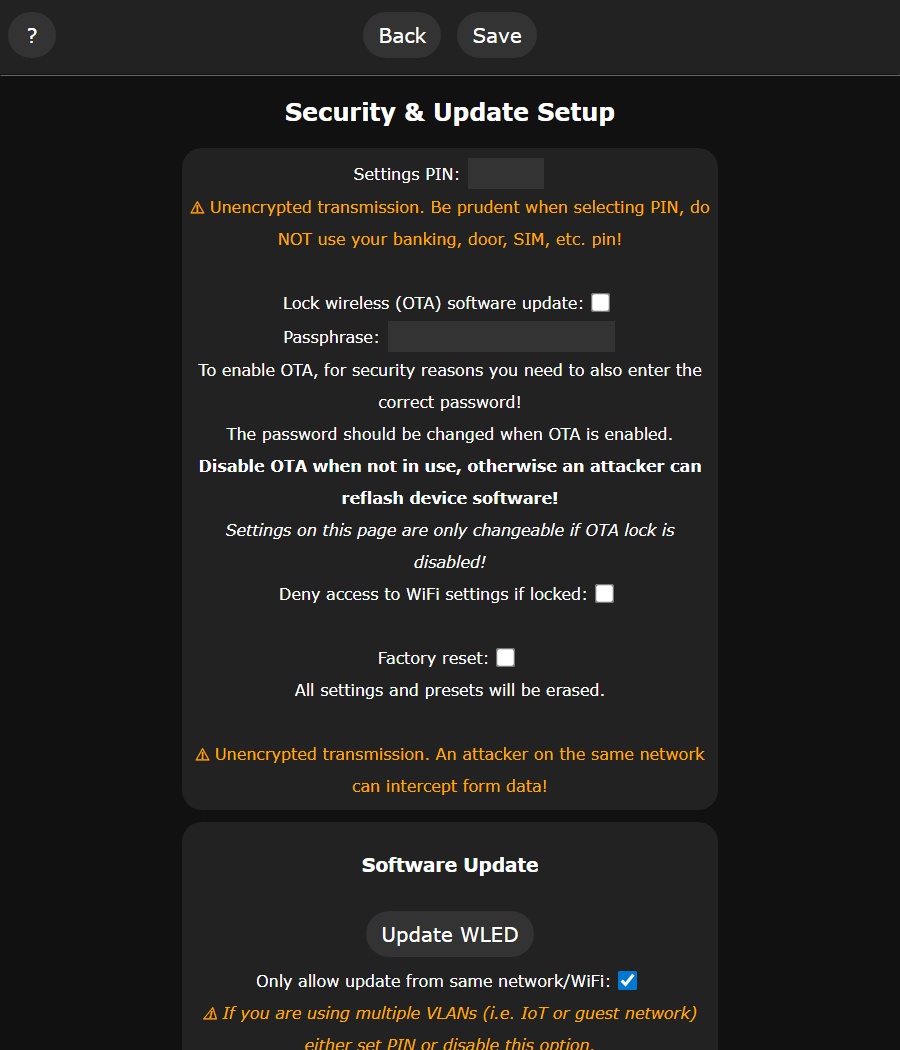
This sub-page manages permissions and updates.
| Setting name | Value Range | Description |
|---|---|---|
| Settings PIN | 4 digits | Asks for a PIN before any settings page opens. Sent unencrypted, so do not reuse a PIN you care about |
| Lock wireless (OTA) software update | Y/N | If enabled, no firmware updates may be done via WiFi and some settings can't be changed |
| Passphrase | String 0..32 | To disable the OTA lock, you need this password. The default is "wledota". Change it! |
| Deny access to WiFi settings if locked | Y/N | Disables changes to WiFi settings while locked |
| Factory reset | Y/N | Deletes all custom settings data (passwords, configuration, macros, presets) |
| Update WLED | - | Opens the page to upload a new firmware binary, if OTA is not locked |
| Only allow update from same network/WiFi | Y/N | Rejects firmware uploads from other subnets. If you use VLANs (IoT or guest network), either set a PIN or disable this. Disabling it makes the device less secure |
| Backup & Restore | - | Download or upload the presets and the configuration as JSON. Restoring overwrites what is on the device. Passwords are not backed up |
| Enable ArduinoOTA | Y/N | Useful for developers. Be careful, can even be left on when OTA locked! Only shown on builds compiled with WLED_ENABLE_AOTA, so it does not appear on the release binaries. |