Quick Start
Welcome to the WLED Wiki!
Say hi to Akemi, the WLED mascot. She marks extra information throughout these docs. Click her any time you want to know more. (1)
- For a new project, an ESP32 is the better pick. It's much more capable hardware, and ESP8266 support is coming to an end.
Quick Start Guide
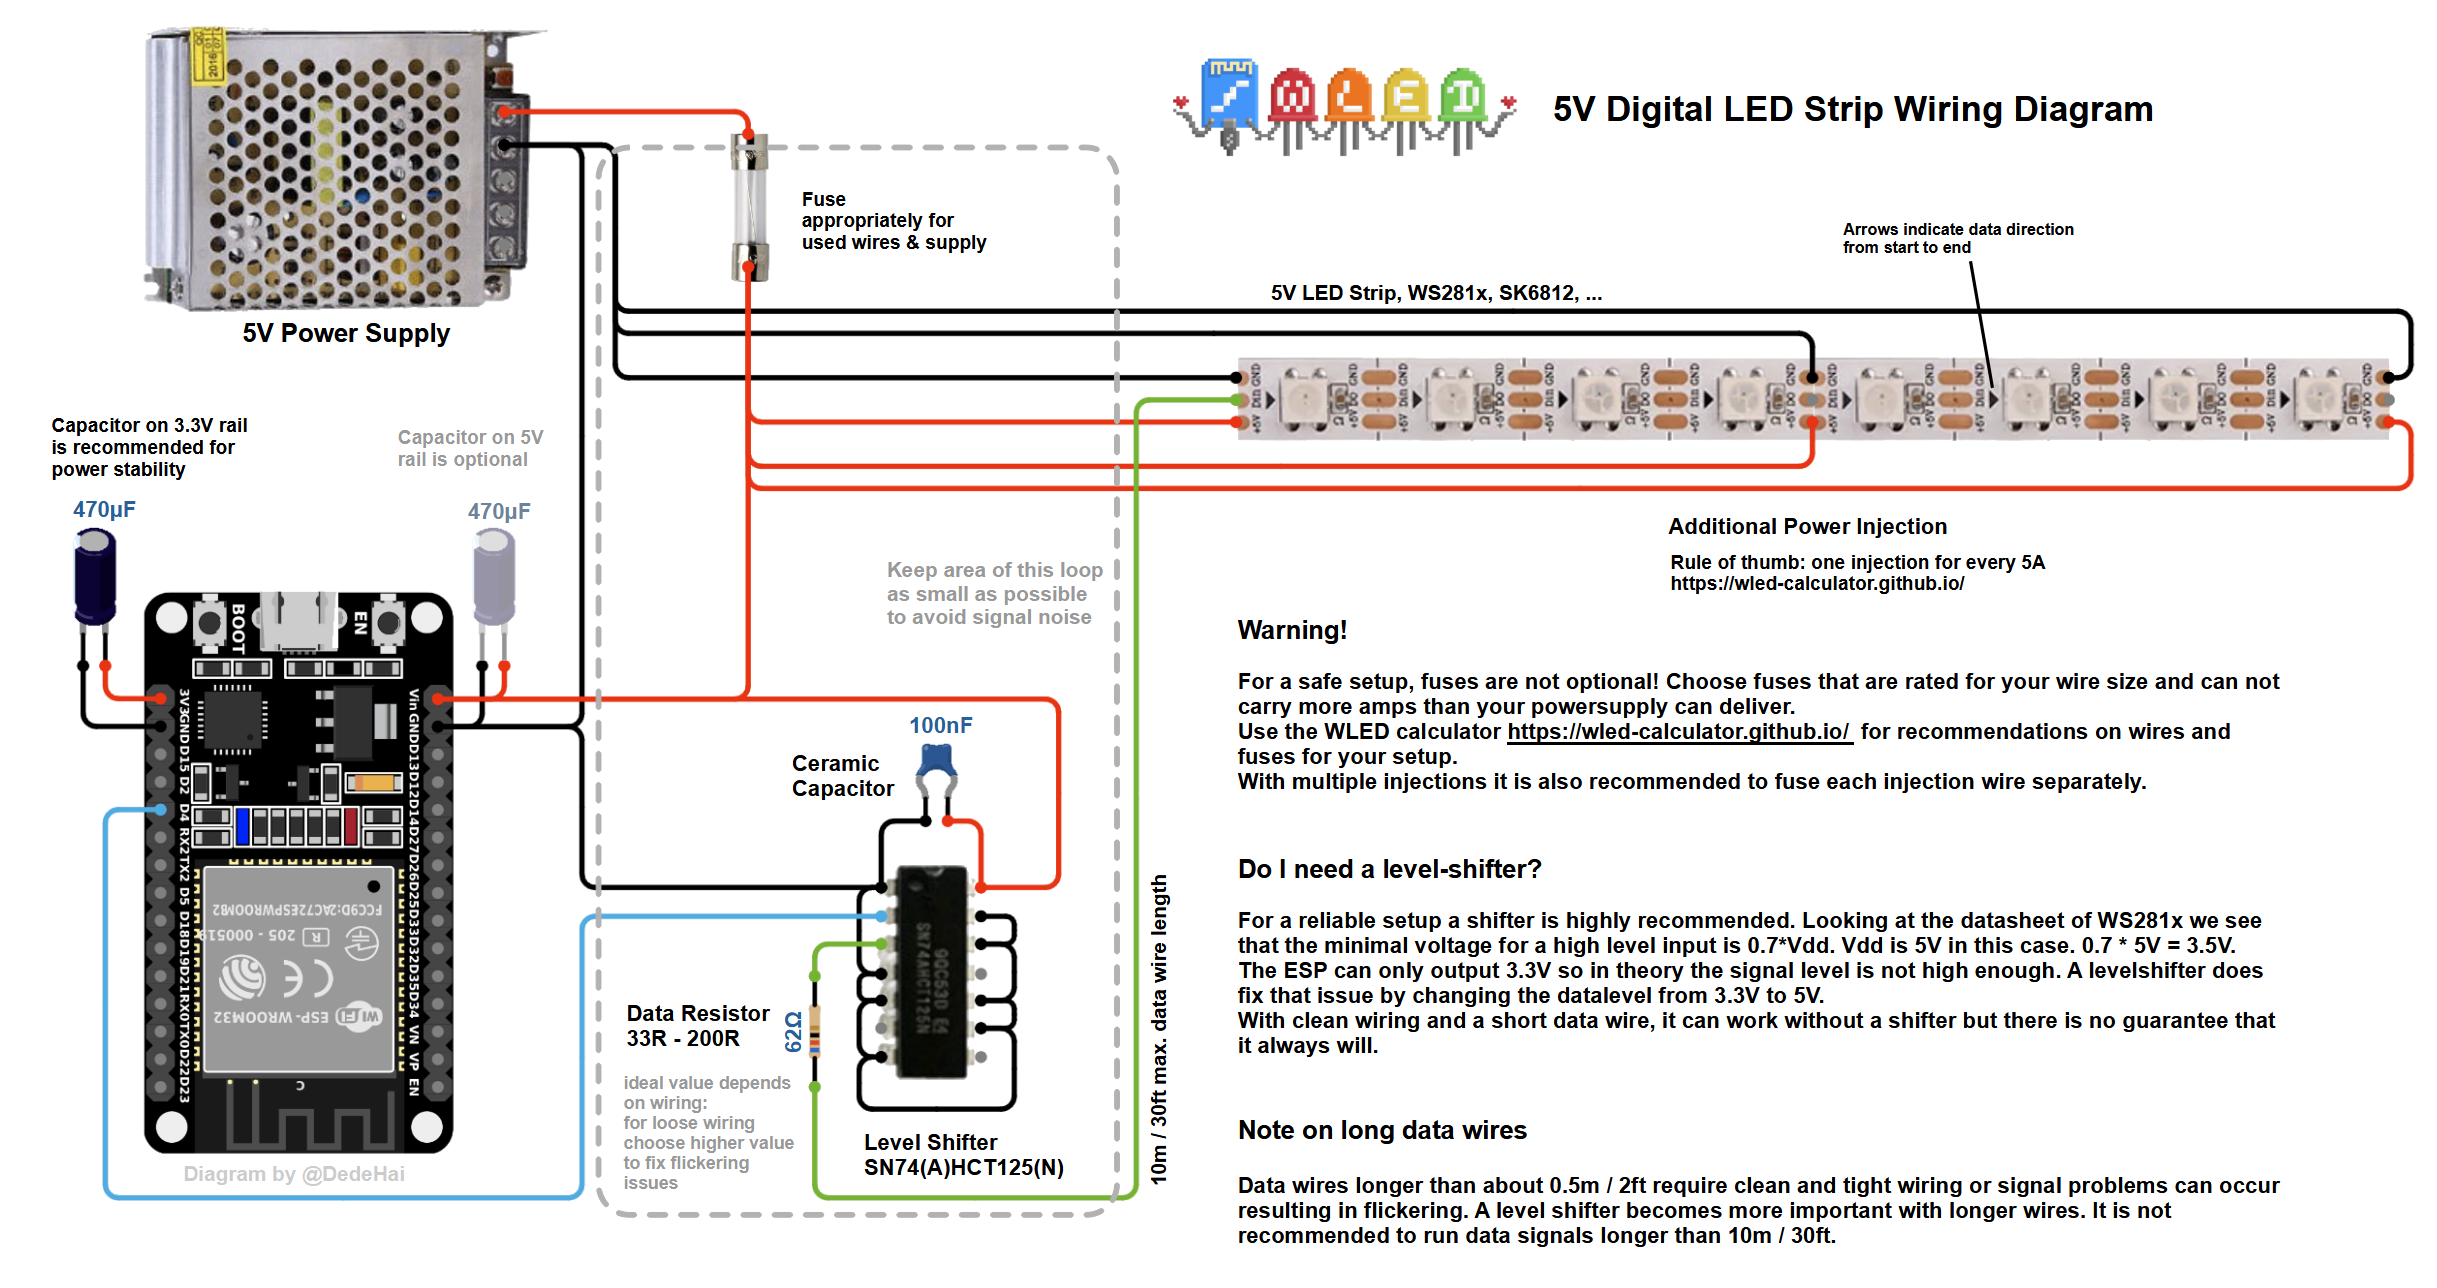
1. Connect your LED strip to your ESP board. A digital strip is three connections at its simplest: power, data, and ground. Analog strips need a channel per color instead. The diagrams below show the extras worth adding.
Also called addressable strips, for example WS2812B-compatible RGB(W) strips. Each LED can be controlled separately.
For ESP32 use GPIO16 (or IO16 or G16); GPIOs 4, 13 and 16-33 can be used, other pins are not recommended.
For ESP8266 use GPIO2, on most development boards this pin is labeled D4. (1)
GPIO1andGPIO2are the recommended LED data pins on ESP8266, andGPIO3works for up to 100 LEDs. Other pins need bit-banging, which can slow performance and cause problems elsewhere such as with IR decoding. For clock-and-data LEDs, hardware SPI usesGPIO14(SCLK) for clock andGPIO13(MOSI) for data, and software SPI works on any pins. All pins can be changed in the Hardware section of LED settings.
If the connecting wire cannot be kept short, use a level shifter.
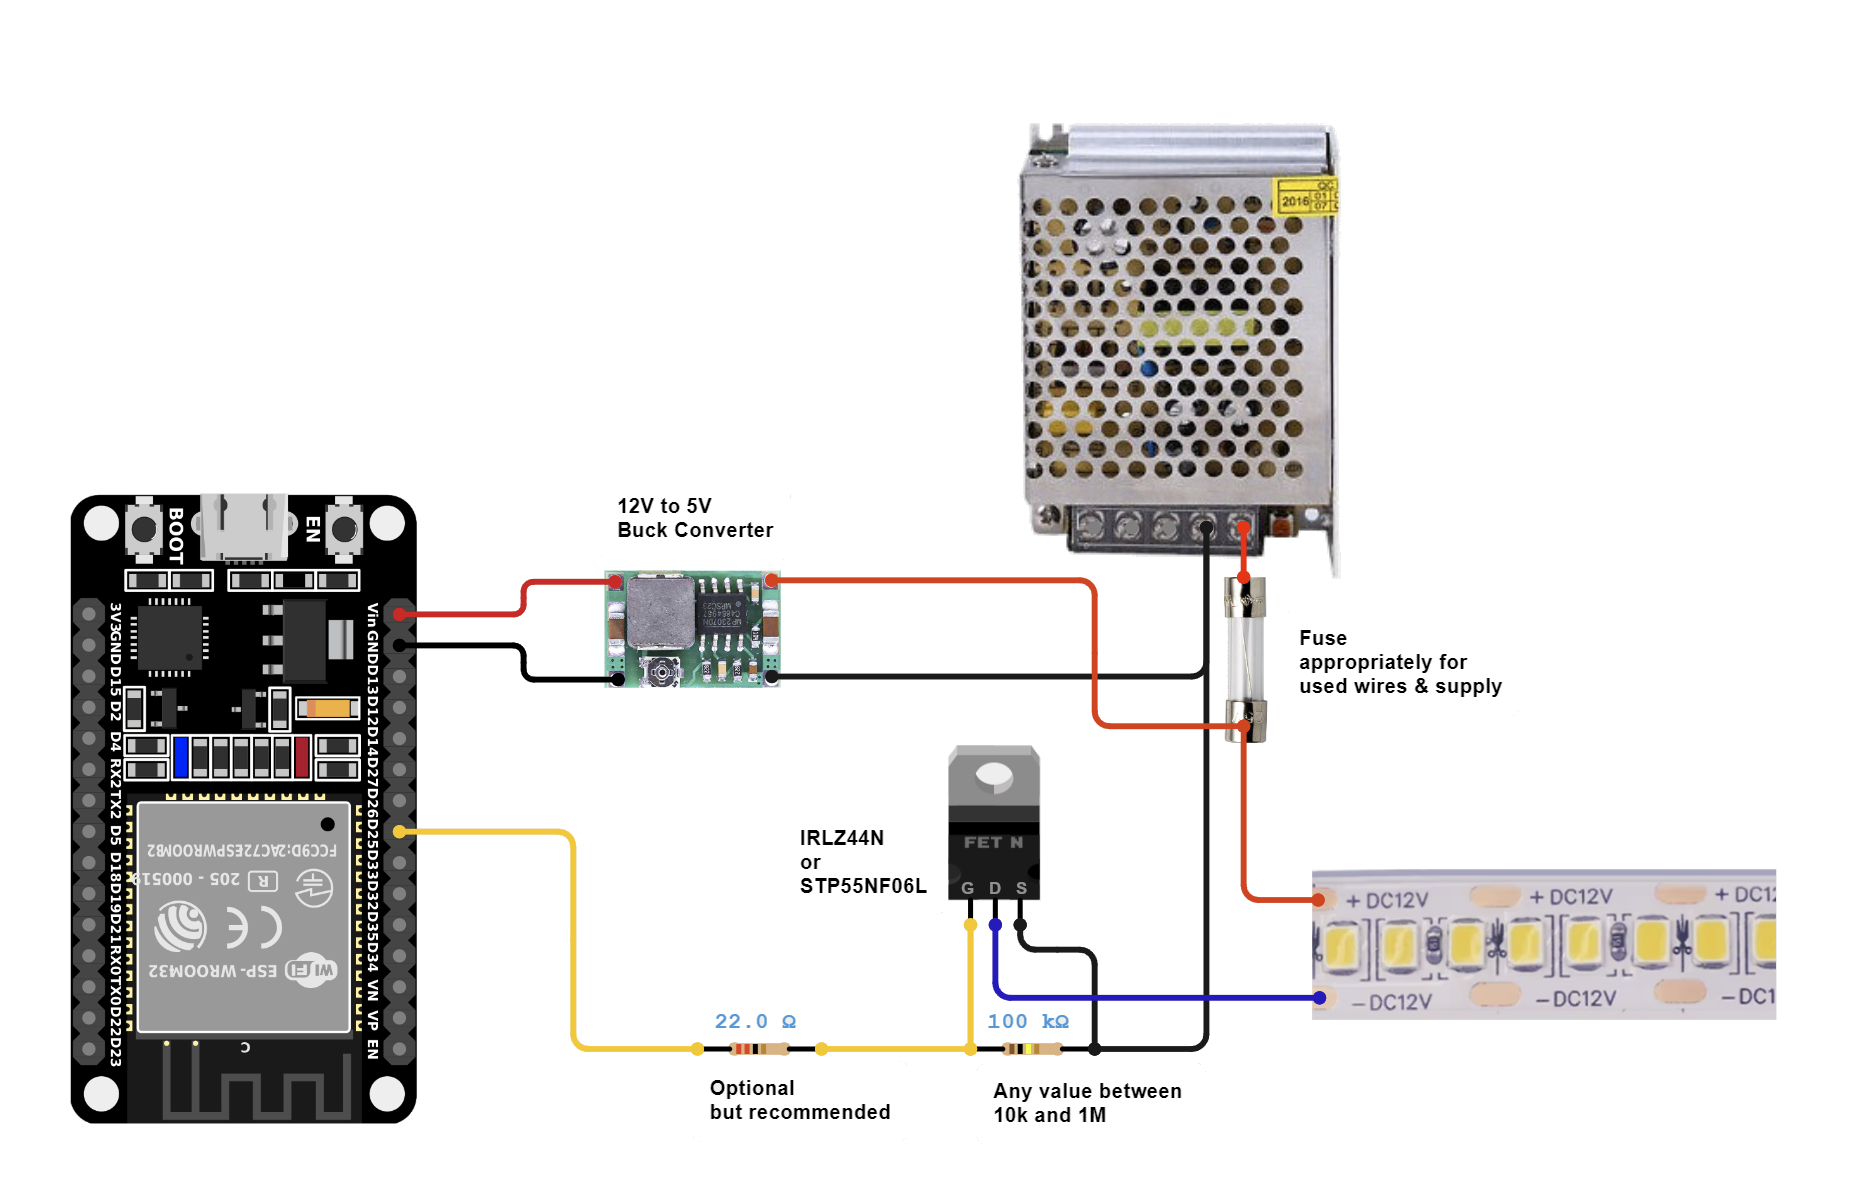
Also called non-addressable strips. Every LED shows the same color, and each color channel needs its own GPIO and MOSFET. The IRLZ44N and STP55NF06L are good choices.
Warning
Board pin naming varies depending on the manufacturer. Please use the board pinout from the specific board you purchased and use the GPIO pins to reference this guide. Make sure to connect ESP and LED-strip grounds together!
2. Flash the software to your ESP board. The web installer flashes it straight from the browser.
Other flashing methods, including for boards with less than 4MB of flash, are on the Install WLED Binary page. Advanced users who want to change WLED before flashing it can compile it from source instead.
How to tell it worked
The first 30 LEDs will light up in bright orange to stimulate courage, friendliness and success! On an analog strip the whole strip turns orange, since every LED shares the same channels.
3. On your phone or computer, connect to the WiFi network WLED-AP using the default password wled1234.
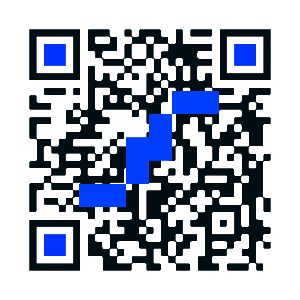
You can also just scan this QR code:
WLED-AP is not showing up!
If you do not see the WLED-AP network, its name may have been changed at compile time.
Open wled.me in your browser to control your lights. The IP 4.3.2.1 works too while you're connected to WLED-AP.
WiFi Setup
To connect your WLED device to your home WiFi:
1. Click on the Config (gear) icon to edit your WLED device settings and choose "WiFi Setup".
2. Select Scan to find nearby networks, or type your network name. Enter your WiFi password, which is case-sensitive.
3. Set an mDNS address, such as wled-livingroom. This becomes the name you use to reach your device from now on. Change the AP password here too, since wled1234 is the same on every WLED device.
4. Click Save & Connect at the bottom of the page.
5. Reconnect your phone or computer to your home WiFi network.
6. Open your mDNS address in a browser, for example http://wled-livingroom.local. If you didn't set one, or the .local name doesn't resolve on your device, use the WLED app to find it, or look up its IP in your router's device list.
4.3.2.1 stops working
Once your device joins your home network, 4.3.2.1 and wled.me stop working. Use your mDNS address or the device's IP instead.
Once you're in, take a look at The Web UI to find your way around the interface.
Find Your Device with the WLED App
The WLED app discovers devices on your network for you, so you don't have to dig through your router.
Install WLED from the App Store.
Install WLED from Google Play.
- Connect your phone to the same WiFi network as your WLED device.
- Your device appears in the app automatically. Select it, then open the Config tab in the top right.
- Choose WiFi Setup. At the bottom of that screen is a text box with your hostname, ending in
.local, and the IP address directly below it.
Either one works in a browser, as http://your-hostname.local or http://your-ip-address.
Useful Links
- 12V strips, multiple strips, several supplies, level shifters: Wiring Guides
- Wire and fuse sizing: LED power, wiring and fuse calculator
- Optional pushbutton for configurable actions. The default is
GPIO0(D3on NodeMCU/Wemos). On ESP32 use any free pin, such asIO17, that you are not already using for LED data
Software Update Procedure
Download the latest release binary and flash it exactly like the first install. The Install WLED Binary page covers every flashing method.
The software has an integrated OTA software update capability.
- Type the correct OTA passphrase (default: "wledota") in the settings menu and remove the tick in the checkbox "OTA locked".
- Save settings and reboot your device.
- Select "Manual OTA update" in Security settings and upload a release binary.
- When you are done, it is recommended to lock the OTA function again. Tick the checkbox and reboot. You can change the passphrase by typing in a new one first.
If you try to access the update page while OTA is locked, you should see the message "OTA lock active".
ArduinoOTA is also possible, but requires a custom build with -D WLED_ENABLE_AOTA added to build_flags.
If you own multiple devices and want to update them
The WLED source code includes shell/command prompt scripts that let you update multiple devices with a single command. Please check the tools subfolder for the multi-update scripts (.cmd or .sh). You will need to modify them to include the IP addresses of your WLED devices and assign a firmware binary file for each device. If you are using Windows, make sure the curl utility is somewhere in your PATH (curl ships with Windows 10 build 17063 and later, and with Windows 11). This will only work if "OTA Lock" is disabled, so turn it back on and reboot once the batch is finished.